Last updated on June 6th, 2026 at 01:26 pm
If you’re running Kubernetes on AWS Elastic Kubernetes Service (EKS) and looking for a smarter way to handle automatic scaling, Karpenter is your new best friend. It dynamically provisions just the right compute resources when your cluster needs them—no manual intervention, no overprovisioning. Karpenter streamlines Kubernetes infrastructure by providing the appropriate nodes precisely when needed.
In this guide, we’ll cover how to configure NodePool and NodeClass in Karpenter using the latest APIs, and we’ll deploy a sample application to actually see the scaling in action.
Let’s dive in.
- What Are NodePool and NodeClass in Karpenter?
- Step-by-Step: Configure Karpenter with NodePool and NodeClass
- Retrieve EKS AMI
- Demo: Scaling in Action
- Logging
What Are NodePool and NodeClass in Karpenter?
Even when Karpenter is running correctly, NodePool configuration can prevent workloads from being scheduled.
Some of the most common issues include:
- Restrictive instance type requirements
- CPU or memory limits that prevent new nodes from being created
- Missing labels required by workloads
- Capacity type mismatches between Spot and On-Demand requirements
- NodePool constraints that cannot satisfy pod scheduling requirements
These issues often appear as FailedScheduling events or workloads stuck in Pending state. For real-world examples, see Karpenter Not Launching Nodes in EKS: Real Debugging Scenarios.
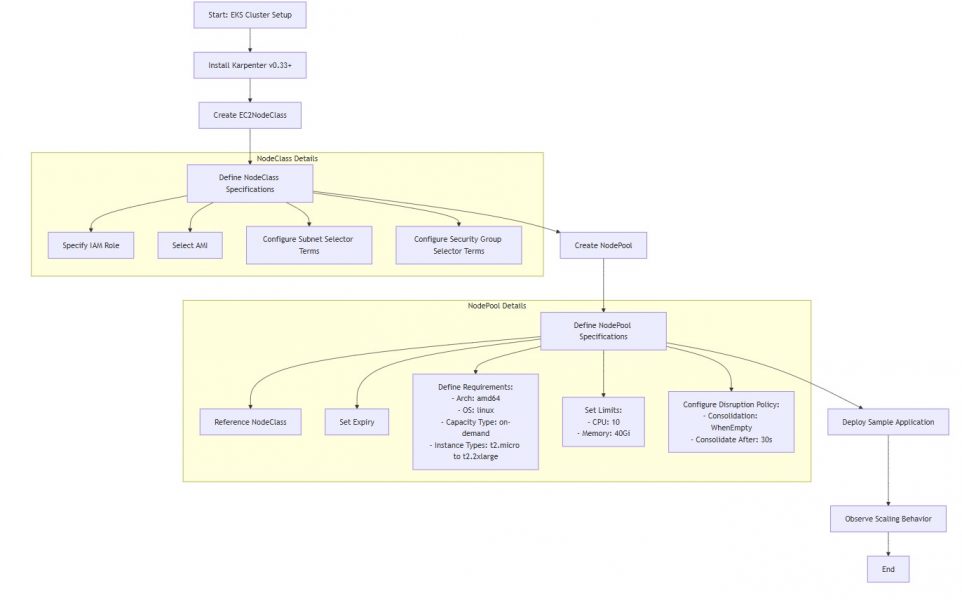
Before Karpenter v0.33, we used Provisioner resources. Now, Karpenter introduces a new API with better separation of concerns:
- NodeClass: Defines the how—like the underlying infrastructure (e.g., EC2 settings, AMI, tags).
- NodePool: Defines the what—like instance types, scheduling rules, taints, and limits.
This separation improves reusability and security. For example, your Dev and Prod environments can share a NodeClass but use different NodePools.
Step-by-Step: Configure Karpenter with NodePool and NodeClass
Prerequisites
- EKS cluster (v1.27 or later) – My cluster is running on version 1.30 / Region US-East-2
- Required IAM roles configured for Karpenter
- Karpenter v0.33+ installed
1. Create a NodeClass
The NodeClass defines how Karpenter should launch EC2 instances.
apiVersion: karpenter.k8s.aws/v1
kind: EC2NodeClass
metadata:
  name: default-karpenter
spec:
  role: "KarpenterNodeRole-cluster-new-efs" # replace with your cluster name
  amiSelectorTerms:
    - alias: "al2@v20250403" #check the next section on how I got that value
  subnetSelectorTerms:
    - tags:
        karpenter.sh/discovery: "" # replace with your cluster name
  securityGroupSelectorTerms:
    - tags:
        karpenter.sh/discovery: "" # replace with your cluster name
Karpenter auto-discovers subnets and security groups using tags. Make sure your AWS resources are tagged correctly.
2. Create a NodePool
The NodePool defines when and what to scale.
- It exclusively initiates on-demand T2 instances that operate on Linux/amd64, a deliberate choice made to minimize monthly charges for your.
- Is limited to a maximum of 10 CPU cores and 40Gi memory total
- Cleans up empty nodes quickly (after 30s) and rotates them every 30 days
- Uses the infra config defined in
EC2NodeClass/default-karpenter
apiVersion: karpenter.sh/v1
kind: NodePool
metadata:
  name: default
spec:
  template:
    spec:
      nodeClassRef:
        group: karpenter.k8s.aws
        kind: EC2NodeClass
        name: default-karpenter
      expireAfter: 720h # 30 * 24h = 720h
      requirements:
        - key: kubernetes.io/arch
          operator: In
          values: ["amd64"]
        - key: kubernetes.io/os
          operator: In
          values: ["linux"]
        - key: karpenter.sh/capacity-type
          operator: In
          values: ["on-demand"]
        - key: node.kubernetes.io/instance-type
          operator: In
          values: ["t2.micro", "t2.small", "t2.medium", "t2.large", "t2.xlarge", "t2.2xlarge"]
  limits:
    cpu: "10"
    memory: 40Gi
  disruption:
    consolidationPolicy: WhenEmpty
    consolidateAfter: 30s
- You’re creating a Karpenter NodePool named default.
- This resource defines what kind of nodes Karpenter should launch and how to manage them.
- This connects the NodePool to a NodeClass (specifically, an EC2NodeClass) named default-karpenter.
- Think of NodeClass like: “how to launch the node in AWS — subnets, AMI, security groups, etc.”
- Each node will be replaced every 30 days (720 hours), even if it’s still healthy, Useful for rolling updates, cost control, avoiding zombie nodes, etc.
- This node pool only supports Linux on amd64 architecture.
- No ARM64 or Windows nodes will be launched here.
- Only on-demand instances will be launched — no Spot, You can change this to [“spot”] or even [“spot”, “on-demand”] to allow both.
- Only these T2 instance types will be considered when scaling up nodes.
- This NodePool will not scale beyond 10 CPUs and 40Gi memory across all its nodes. So even if demand increases, Karpenter won’t launch more than this limit.
- Karpenter will consolidate nodes (i.e., remove them) when they become empty.If a node is idle for 30 seconds, it’s a candidate for consolidation.
- Great for saving money and keeping your cluster tidy.
Retrieve EKS AMI
To obtain an AMI ID that matches your specified configuration, utilize the AWS Systems Manager Parameter Store API. This approach removes the necessity of manually searching for Amazon EKS optimized AMI IDs.
In my situation, I opted for Amazon Linux 2, although it is approaching its end of life at the time of writing this tutorial. I suggest beginning to explore Amazon Linux 2023 as an alternative. (Amazon Linux EOL details) – I recommend to start considering AL2023
 $ echo ${K8S_VERSION}
1.30
$aws ssm get-parameter --name "/aws/service/eks/optimized-ami/${K8S_VERSION}/amazon-linux-2/recommended/image_id" --region us-
east-2
{
    "Parameter": {
        "Name": "/aws/service/eks/optimized-ami/1.30/amazon-linux-2/recommended/image_id",
        "Type": "String",
        "Value": "ami-024a51bfc3591faeb",
        "Version": 36,
        "LastModifiedDate": "2025-04-04T18:08:37.356000-04:00",
        "ARN": "arn:aws:ssm:us-east-2::parameter/aws/service/eks/optimized-ami/1.30/amazon-linux-2/recommended/image_id",
        "DataType": "text"
    }
}
$ aws ec2 describe-images --query 'Images[0].Name' --image-ids ami-024a51bfc3591faeb --region us-east-2
"amazon-eks-node-1.30-v20250403"
$
More details on retrieving AMI’s can be found here
Now that I got the AMI image details, my amiSelectorTerms alias will be
alias: "al2@v20250403"
Please be aware that the version mentioned above may vary based on the patch releases issued by EKS. Therefore, it might differ when you attempt to grab the image details
Demo: Scaling in Action
Before we start lets take a look at my current nodes and pending pods.

Sample Deployment (CPU Hog)
apiVersion: apps/v1
kind: Deployment
metadata:
  name: cpu-hog
spec:
  replicas: 5
  selector:
    matchLabels:
      app: cpu-hog
  template:
    metadata:
      labels:
        app: cpu-hog
    spec:
      containers:
        - name: stress
          image: progrium/stress
          args:
            - "--cpu"
            - "2"
          resources:
            requests:
              cpu: "1000m"
              memory: "512Mi"
            limits:
              cpu: "1000m"
              memory: "512Mi"
This will request 5 CPUs and 2.5 Gi of memory, more than what your current nodes probably have—so Karpenter will kick in.
As soon as you apply the above deployment you will start noticing the change, pods obviously will be in pending status for couple of seconds before it gets assigned to a new node by Karpenter
% k get pods
NAME                                             READY   STATUS    RESTARTS   AGE
cpu-hog-66ff5c5fc8-4gcdt                         0/1     Pending   0          24s
cpu-hog-66ff5c5fc8-8frjs                         0/1     Pending   0          24s
cpu-hog-66ff5c5fc8-brjpz                         0/1     Pending   0          24s
cpu-hog-66ff5c5fc8-hxtz5                         0/1     Pending   0          24s
cpu-hog-66ff5c5fc8-nfwn4                         0/1     Pending   0          24s
demo-pod1                                          1/1     Running   0          171d
demo-pod2                               1/1     Running   0          8d
demo-pod3                                1/1     Running   0          15d
% k get nodes
NAME                                          STATUS   ROLES    AGE    VERSION
ip-172-31-26-27.us-east-2.compute.internal   Ready    <none>   46s    v1.30.9-eks-5d632ec
ip-172-31-26-104.us-east-2.compute.internal   Ready    <none>   171d   v1.30.4-eks-a737599
ip-172-31-9-198.us-east-2.compute.internal    Ready    <none>   16d    v1.30.4-eks-a737599
 % k get pods
NAME                                             READY   STATUS    RESTARTS   AGE
cpu-hog-66ff5c5fc8-4gcdt                         1/1     Running   0          95s
cpu-hog-66ff5c5fc8-8frjs                         1/1     Running   0          95s
cpu-hog-66ff5c5fc8-brjpz                         1/1     Running   0          95s
cpu-hog-66ff5c5fc8-hxtz5                         1/1     Running   0          95s
cpu-hog-66ff5c5fc8-nfwn4                         1/1     Running   0          95s
demo-pod1                                              1/1     Running   0          171d
demo-pod2                                            1/1     Running   0          8d
demo-pod3                                   1/1     Running   0          15d
In parallel using EKS node viewer you should be see pending pods and within seconds new node getting added to EKS cluster (5 Pending Pods initially) – screenshots for reference only. As you can see initially before the deployment I only had 2 nodes and Karpenter helped me adding the 3rd node to make sure pods are deployed and running.


When your workload scale down, you should see that the node gets deleted

Logging
Execute the command to retrieve the list of Karpenter pods, and subsequently utilize the kubectl log command to examine the details. These log samples serve to illustrate how you can validate Karpenter logs and ensure that everything is functioning as intended.
$ kubectl logs -n karpenter karpenter-controller-abcdef123
Log #1: NodeClaim Registered
{
  "level": "INFO",
  "time": "2025-04-11T19:43:06.621Z",
  "message": "registered nodeclaim",
  "NodeClaim": { "name": "default-wl8pd" },
  "provider-id": "aws:///us-east-2b/i-xxx",
  "Node": { "name": "ip-172-31-26-27.us-east-2.compute.internal" }
}
What it means:
- Karpenter has created and registered a
NodeClaimnameddefault-wl8pd. - This claim represents a node that is being launched via AWS EC2.
- The actual EC2 instance ID is:
i-xxxin zoneus-east-2b. - The EC2 node got the hostname:
ip-172-31-26-27.us-east-2.compute.internal.
Log #2: NodeClaim Initialized
{
  "level": "INFO",
  "time": "2025-04-11T19:43:22.918Z",
  "message": "initialized nodeclaim",
  "NodeClaim": { "name": "default-wl8pd" },
  "provider-id": "aws:///us-east-2b/i-xxxx",
  "Node": { "name": "ip-172-31-26-27.us-east-2.compute.internal" },
  "allocatable": {
    "cpu": "7910m",
    "memory": "32000812Ki",
    "ephemeral-storage": "18242267924",
    "pods": "44"
  }
}
What it means:
- The node is now fully initialized and ready to schedule pods.
- Karpenter has successfully determined the node’s allocatable resources
In production environments, NodePool configuration often becomes one of the first places to investigate when workloads remain Pending or Karpenter appears unable to provision capacity.
While Karpenter itself may be healthy, scheduling constraints, NodePool limits, and workload requirements can prevent new nodes from being created.
