Amazon Elastic Kubernetes Service (EKS) Auto Mode is a simplified way to run Kubernetes on AWS. It reduces the complexity of managing Kubernetes clusters by automating tasks related to infrastructure, scaling, and configuration. If you’re building Kubernetes applications and want to reduce the time spent on infrastructure management, EKS Auto Mode is a great choice.
- Launch Auto Mode Cluster
- Configure Cluster
- Create Custom NodePool / NodeClass
- Launch POD in Custom Nodepool
Launch Auto Mode Cluster
In the AWS console when you try to create a cluster, there will be 2 options
1] Quick configuration (with EKS Auto Mode) – It is just a single page set up (easy option)
2] Custom configuration – If you want to create a standard AWS EKS cluster with or without Auto Mode enabled. You also have options to select add-ons / configure observability / networking etc.,
In this tutorial we are going to do the quick configuration set up.
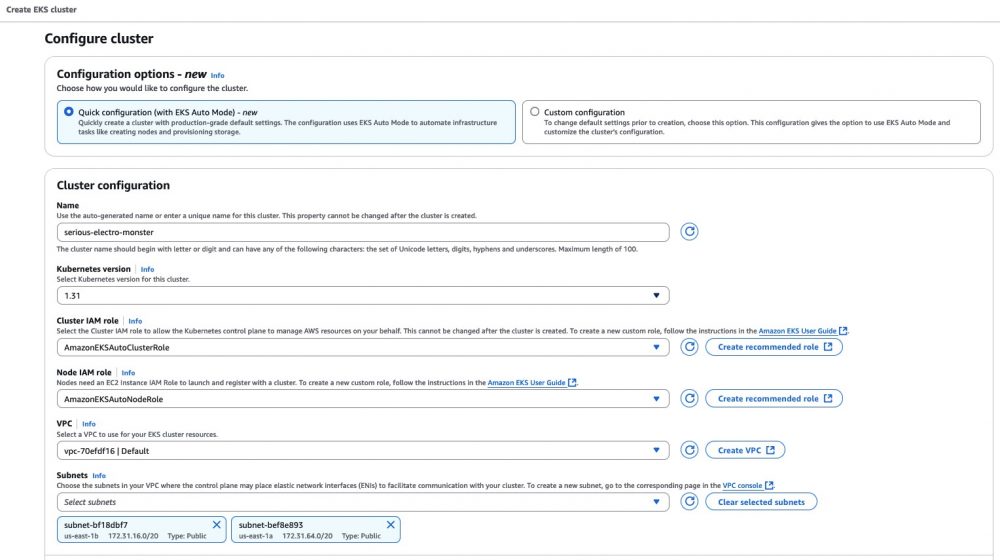
I have specified the name, version, associated IAM roles, and VPC/Subnets (select at least 2). To set up the Cluster and Node IAM roles, just click the “Create recommended role” button, and the IAM role setup will be completed for you.
Here is the list of configurations that are editable after the cluster creation

Once everything is verified click on the “Create” button. You will see a page similar to the one below stating cluster status as “Creating“

It took around 14 minutes for my cluster to be in Active state.
Configure Cluster
Once the cluster is “Active”, you can go to the “Compute” tab and we will see 2 Built-in node pools (at the time of writing this tutorial)
1] General-purpose
2] System
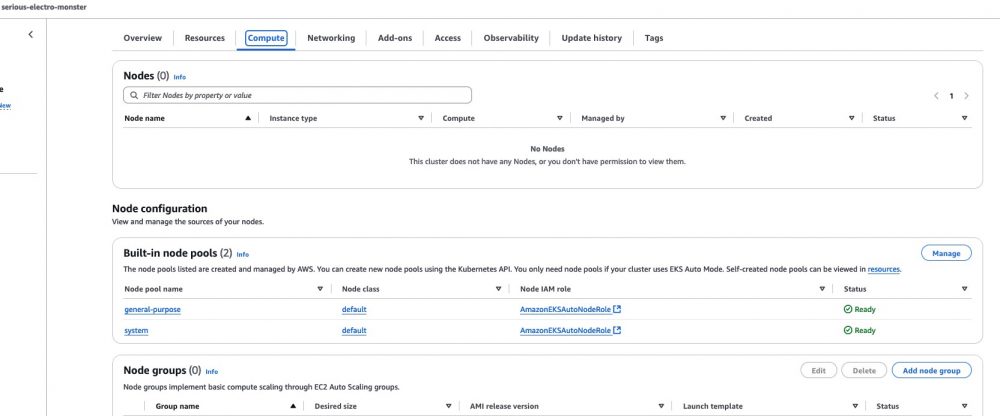
You can disable/enable these default node pool and configure your own node pools using Kubernetes API but they will not appear in the console (at the time of writing this tutorial) . More details can be found in this documentation.
By default if you have completed the setup till this section you can run your pods by defining eks.amazonaws.com/compute-type: auto as the nodeselector
    spec:
      terminationGracePeriodSeconds: 0
      nodeSelector:
        eks.amazonaws.com/compute-type: auto
We can see in the next section on how to build your own custom NodePool / NodeClass.
More details on deploying workload in Auto Mod default NodePool can be found in this documentation
Create Custom NodePool / NodeClass
Our objective in this context is to implement a pod utilizing a custom NodePool, which grants you complete control, as the default built-in NodePool is not subject to modification.
Lets start by defining custom NodeClass, save this manifest as custom_nodeclass.yaml
apiVersion: eks.amazonaws.com/v1
kind: NodeClass
metadata:
  name: my-private-nodeclass
spec:
  ephemeralStorage:
    iops: 3000
    size: 80Gi
    throughput: 125
  networkPolicy: DefaultAllow
  networkPolicyEventLogs: Disabled
  role: AmazonEKSAutoNodeRole
  securityGroupSelectorTerms:
  - id: sg-071ccd31dd4a66b54
  snatPolicy: Random
  subnetSelectorTerms:
  - id: subnet-bf18dbf7
  - id: subnet-bef8e893
Next step is to create NodePool, save this manifest as custom_nodepool.yaml
apiVersion: karpenter.sh/v1
kind: NodePool
metadata:
  name: my-default-test-nodepool
spec:
  template:
    metadata:
      labels:
        billing-team: my-team
    spec:
      nodeClassRef:
        group: eks.amazonaws.com
        kind: NodeClass
        name: my-private-nodeclass

      requirements:
        - key: "eks.amazonaws.com/instance-category"
          operator: In
          values: ["c", "m", "r"]
        - key: "eks.amazonaws.com/instance-cpu"
          operator: In
          values: ["4", "8", "16", "32"]
        - key: "topology.kubernetes.io/zone"
          operator: In
          values: ["us-east-1a", "us-east-1b"]
        - key: "kubernetes.io/arch"
          operator: In
          values: ["arm64", "amd64"]

  limits:
    cpu: "1000"
    memory: 1000Gi
Apply the new custom NodePool and NodeClass
% kubectl apply -f custom_nodeclass.yaml
nodeclass.eks.amazonaws.com/my-private-nodeclass created

% kubectl apply -f custom_nodepool.yaml
nodepool.karpenter.sh/my-default-test-nodepool created
Verify NodePool and NodeClass are created successfully
% kubectl get nodepool
NAME                       NODECLASS              NODES   READY   AGE
general-purpose            default                0       True    119m
my-default-test-nodepool   my-private-nodeclass   0       True    24m
system                     default                0       True    119m

% kubectl get nodeclass
NAME                   ROLE                    READY   AGE
default                AmazonEKSAutoNodeRole   True    119m
my-private-nodeclass   AmazonEKSAutoNodeRole   True    38m
%
Awesome we are all set with the node configuration
Launch POD in Custom Nodepool
The last and final step is to launch a pod in the custom NodePool we created. In order for us to configure the pod to be launched in the custom NodePool my-default-test-nodepool just add the nodeselector with the label billing-team: my-team
  nodeSelector:
    billing-team: my-team
Complete pod manifest looks like, save it as custom_pod.yaml
apiVersion: v1
kind: Pod
metadata:
  name: myapp-in-custom-nodepool
spec:
  nodeSelector:
    billing-team: my-team
  containers:
    - name: nginx
      image: nginx:1.14.2
      ports:
       - containerPort: 80
Apply the pod
% kubectl apply -f custom_pod.yaml
Verify that pod is running
% kubectl get pods
NAME                       READY   STATUS    RESTARTS   AGE
myapp-in-custom-nodepool   1/1     Running   0          14m
%
You can also verify through the AWS console to see the node that got launched along with the NodePool name it is using
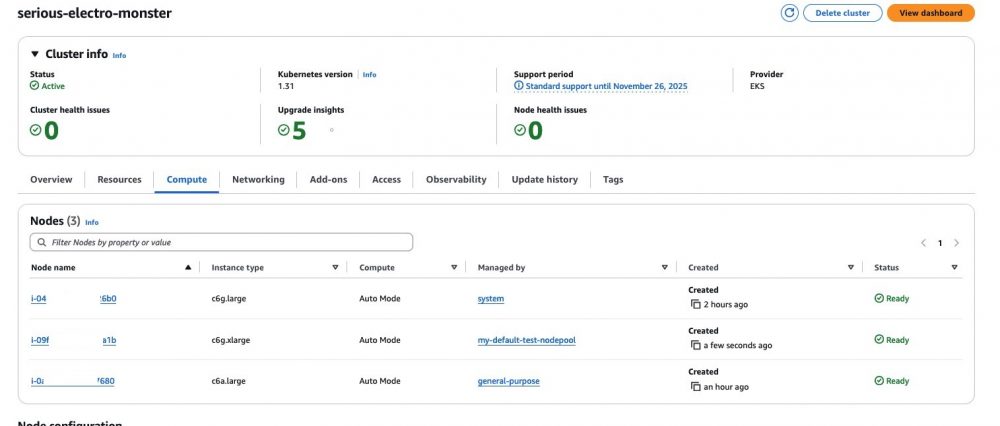
Great job, I hope you got some idea on how quickly you can launch an EKS cluster in Auto Mode while also adding a custom NodePool or NodeClass to tailor your use cases.
