Last updated on June 19th, 2026 at 01:31 pm
In this guide, you’ll learn how Amazon EKS autoscaling works using the Horizontal Pod Autoscaler (HPA), Vertical Pod Autoscaler (VPA), and Karpenter. We’ll simulate a traffic spike to demonstrate how Kubernetes automatically scales pods, optimizes resource requests, and provisions new EC2 nodes when cluster capacity is exhausted.
HPA vs VPA vs Karpenter
| Tool | What it scales | Best used for |
|---|---|---|
| HPA | Pod replicas | Traffic spikes |
| VPA | CPU/memory requests | Right-sizing workloads |
| Karpenter | EC2 nodes | Adding/removing cluster capacity |
Together, these three components provide complete Amazon EKS autoscaling by scaling application replicas, optimizing pod resources, and adding or removing cluster nodes automatically.
HPA decides how many pods should run. VPA recommends how large each pod should be. Karpenter decides whether the cluster needs more nodes to run those pods.
If you’ve ever wondered how to scale pods and nodes together in EKS without breaking the bank, this guide is for you.
- Prerequisites
- Step 1: Deploy a Sample Web Application
- Step 2: Horizontal Pod Autoscaler (HPA)
- Step 3: Vertical Pod Autoscaler (VPA)
- Step 4: Karpenter for Node Scaling
- What’s Next? How to Induce Load on Your Webapp
- Troubleshooting
How Karpenter Works
Karpenter continuously watches for pending pods that cannot be scheduled because the cluster lacks available capacity.
When it detects unschedulable pods, it communicates directly with the AWS EC2 API to provision the most suitable instances based on your NodePool and EC2NodeClass configuration.
Unlike Cluster Autoscaler, Karpenter does not rely on Auto Scaling Groups (ASGs), allowing it to provision the optimal instance types dynamically.
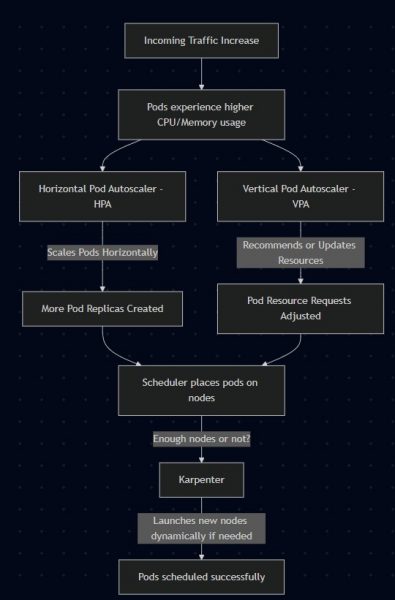
Workflow of how HPA, VPA, and Karpenter scale workloads in Amazon EKS.
Prerequisites
- Amazon EKS cluster
- Metrics Server installed
- IAM permissions for Karpenter
kubectlconfigured- Helm installed
- Existing node group or Karpenter bootstrap capacity
This guide uses the Karpenter v1 API with
NodePool,EC2NodeClass, andNodeClaim. If you are using older Karpenter versions, your manifests may useProvisionerandAWSNodeTemplateinstead.
Step 1: Deploy a Sample Web Application
apiVersion: apps/v1
kind: Deployment
metadata:
  name: webapp
spec:
  replicas: 1
  selector:
    matchLabels:
      app: webapp
  template:
    metadata:
      labels:
        app: webapp
    spec:
      containers:
      - name: webapp
        image: nginx
        resources:
          requests:
            cpu: "100m"
            memory: "128Mi"
          limits:
            cpu: "200m"
            memory: "256Mi"
        ports:
        - containerPort: 80
Expose the deployment:
kubectl expose deployment webapp --port=80 --type=LoadBalancer
Step 2: Horizontal Pod Autoscaler (HPA)
Install the HPA controller if not already enabled, then create an HPA:
HPA requires CPU or memory requests on the deployment. Without resource requests, HPA cannot calculate utilization correctly.
resources:
  requests:
    cpu: "100m"
    memory: "128Mi"
  limits:
    cpu: "500m"
    memory: "512Mi"
kubectl autoscale deployment webapp --cpu-percent=50 --min=1 --max=10
This ensures that if the CPU usage of pods goes above 50%, Kubernetes will scale up replicas (up to 10).
Follow official guide on how to install HPA on AWS EKS
Step 3: Vertical Pod Autoscaler (VPA)
Here’s where it gets tricky.
Best Practice: Avoid running both HPA and VPA in automatic mode for the same CPU or memory metrics. HPA adjusts the number of pod replicas based on resource utilization, while VPA changes the CPU and memory requests for individual pods. When both controllers modify the same metrics simultaneously, they can work against each other and cause unnecessary scaling or pod restarts.
updateMode: "Off"Instead:
- Run HPA in Auto (scales replicas).
- Run VPA in recommendation mode (
updateMode: Off) to get insights, without pod evictions.
Follow the official guide: Vertical Pod Autoscaler Installation
Since VPA is running in recommendation mode, it won’t modify your pods automatically. This lets HPA manage replica scaling without conflicting with VPA
Create a VPA (Recommendation-Only)
apiVersion: autoscaling.k8s.io/v1
kind: VerticalPodAutoscaler
metadata:
  name: webapp-vpa
spec:
  targetRef:
    apiVersion: apps/v1
    kind: Deployment
    name: webapp
  updatePolicy:
    updateMode: "Off"   # Recommendation-only mode
Apply:
kubectl apply -f webapp-vpa.yaml
Check VPA Recommendations
kubectl describe vpa webapp-vpa
You’ll see recommendations like:
Recommendation:
  Container Recommendations:
    Container Name:  webapp
      Target:
        cpu:     150m
        memory:  256Mi
      Lower Bound:
        cpu:     100m
        memory:  128Mi
      Upper Bound:
        cpu:     400m
        memory:  512Mi
👉 This means VPA analyzed your workload and suggests updating resource requests. You can manually adjust your Deployment if you agree.
Step 4: Karpenter for Node Scaling
Pods cannot scale if your Amazon EKS cluster runs out of available nodes. This is where Karpenter comes in. Unlike the traditional Cluster Autoscaler, Karpenter provisions EC2 instances directly based on your workload requirements, allowing the cluster to scale faster and more efficiently.
To understand how Karpenter provisions new nodes, it’s important to understand the two Kubernetes resources that drive its behavior.
Karpenter uses two core resources:
- EC2NodeClass – Defines AWS-specific settings such as the IAM role, AMI family, subnets, and security groups.
- NodePool – Defines how Karpenter provisions nodes, including scheduling requirements, capacity type (Spot or On-Demand), resource limits, and disruption policies.
If you’re new to these resources, read How to Configure NodePool and EC2NodeClass in Karpenter EKS, where I explain every field with practical examples.
The relationship between the two resources is shown below:
apiVersion: karpenter.sh/v1
kind: NodePool
metadata:
  name: default
spec:
  template:
    spec:
      nodeClassRef:
        group: karpenter.k8s.aws
        kind: EC2NodeClass
        name: default
In this example, the NodePool references an EC2NodeClass named default. During node provisioning, Karpenter combines the scheduling rules from the NodePool with the AWS infrastructure settings defined in the EC2NodeClass to launch the appropriate EC2 instances.
What happens during a traffic spike
The following sequence shows how HPA, VPA, and Karpenter work together when your application experiences a sudden increase in traffic.
Traffic increases
↓
Pod CPU rises above HPA target
↓
HPA creates more replicas
↓
Some pods become Pending
↓
Karpenter detects unschedulable pods
↓
Karpenter creates a NodeClaim
↓
New EC2 node joins the EKS cluster
↓
Pending pods are scheduled
↓
VPA provides updated CPU/memory recommendations
What’s Next? How to Induce Load on Your Webapp
Before testing autoscaling, make sure your EKS cluster is healthy. You may also find this useful: How I Built a Multi-Agent Amazon EKS Troubleshooting System with Claude Code
To see autoscaling in action, we need to simulate traffic. Here’s a simple way to do it using a temporary busybox pod:
kubectl run -it load-generator --image=busybox --restart=Never -- sh
Once inside the pod shell, run a loop to continuously hit your webapp’s service:
while true; do
  wget -q -O- http://webapp.default.svc.cluster.local
done
- This will generate CPU usage on your webapp pods.
- You should see HPA increasing replicas after a few seconds/minutes.
- VPA will collect resource usage metrics and update recommendations (if in recommendation mode).
- Karpenter may launch new nodes if the existing ones cannot accommodate all pods.
After setting everything up, here are some sample outputs you might see as your cluster reacts to load:
HPA Scaling Pods
kubectl get hpa
NAME     REFERENCE           TARGETS   MINPODS   MAXPODS   REPLICAS   AGE
webapp   Deployment/webapp   85%/50%   1         10        6          5m
👉 CPU usage went above 50%, so HPA scaled the webapp deployment up to 6 replicas.
VPA Recommendations
kubectl describe vpa webapp-vpa
Recommendation:
  Container Recommendations:
    Container Name:  webapp
      Target:
        cpu:     180m
        memory:  256Mi
      Lower Bound:
        cpu:     100m
        memory:  128Mi
      Upper Bound:
        cpu:     400m
        memory:  512Mi
👉 VPA analyzed the workload and suggests increasing CPU requests to 180m for better stability.
Karpenter Adding Nodes
kubectl get nodes
NAME                                         STATUS   ROLES    AGE   VERSION
ip-192-168-22-101.us-east-2.compute.internal Ready    <none>   8m    v1.30.0-eks
ip-192-168-55-202.us-east-2.compute.internal Ready    <none>   2m    v1.30.0-eks
👉 A new node joined (ip-192-168-55-202) because HPA scaled pods beyond the existing node capacity.
- HPA = handles replica scaling automatically.
- VPA (recommendation mode) = gives you resource tuning insights.
- Karpenter = adds/removes cluster nodes dynamically.
Together, these tools give you a full stack of autoscaling: pods + resources + nodes.
⚡ Pro tip: Run a simple load test (like kubectl run -it busybox -- sh -c "while true; do wget -q -O- http://webapp; done") and watch autoscaling happen in real time.
This setup ensures your app scales efficiently at the pod level (HPA/VPA) and cluster level (Karpenter) while avoiding conflicts.
Troubleshooting
HPA is not scaling
Check:
kubectl get hpa
kubectl describe hpa webapp
kubectl top pods
Common causes:
- Metrics Server not installed
- CPU requests missing
- Load is not high enough
- Wrong target metric
Karpenter is not launching nodes
If Karpenter does not create nodes even when pods are Pending, see my detailed guide on Karpenter debugging: Karpenter Not Launching Nodes in EKS: Real Debugging Scenarios
Check:
kubectl get nodepool
kubectl get ec2nodeclass
kubectl get nodeclaims
kubectl logs -n karpenter -l app.kubernetes.io/name=karpenter
Common causes:
- Wrong subnet tags
- Wrong security group tags
- IAM permissions missing
- NodePool requirements too restrictive
- No EC2 capacity available
VPA recommendations are empty
Check:
kubectl get vpa
kubectl describe vpa webapp-vpa
Common causes:
- Workload has not run long enough
- Metrics unavailable
- VPA recommender not healthy
Final Thoughts
HPA, VPA, and Karpenter solve different layers of autoscaling in Amazon EKS. HPA reacts to application demand by adding pods. VPA helps right-size CPU and memory requests. Karpenter adds or removes EC2 capacity when the cluster needs more nodes. Used together carefully, they give you responsive scaling without overprovisioning your cluster.
