If you’re working with Amazon ECS and want to expose your containerized app to the internet via a Load Balancer, you’re in the right place. In this guide, I’ll walk you through the exact steps to deploy your ECS service with an Application Load Balancer (ALB) and expose a custom port, like 8080, using either Fargate (serverless) or EC2 launch types. This tutorial walks you through building a simple Flask app that listens on port 8080, writing a Dockerfile, and exposing the containerized service for scalable deployment.
- Why Use a Load Balancer with ECS?
- Step-by-Step: Deploy ECS with ALB and Custom Port
- How to Containerize a Flask App?
This setup is perfect when you’re building microservices, APIs, or web apps that don’t run on the default port 80.
Why Use a Load Balancer with ECS?
Amazon ECS is great for deploying containerized applications, but if you want to:
- Make your service publicly accessible,
- Handle dynamic scaling,
- Route traffic based on path or host, you need an Application Load Balancer (ALB) in front of your ECS tasks.
Step-by-Step: Deploy ECS with ALB and Custom Port
Before we begin, you should have these cli’s installed
- docker
- aws
Make sure you have included your region accordingly in the AWS cli configuration. Replace <aws_account_id>, <region> with the respective values.
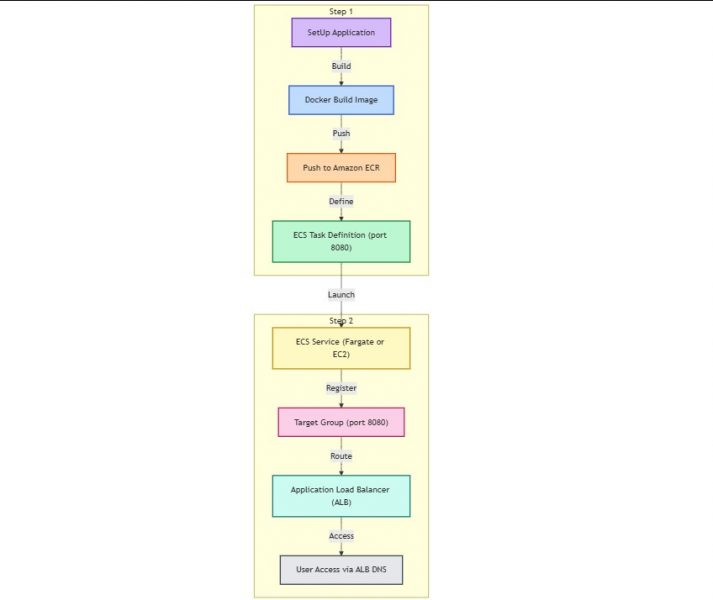
1. Push Your Docker Image to Amazon ECR
If you need assistance in building and containerizing a sample application from scratch check this out.
$ docker build -t my-app .
$ docker tag my-app:latest <aws_account_id>.dkr.ecr.<region>.amazonaws.com/my-app:latest

$ aws ecr create-repository --repository-name my-app
$ aws ecr get-login-password | docker login --username AWS --password-stdin <aws_account_id>.dkr.ecr.<region>.amazonaws.com
$ docker push <aws_account_id>.dkr.ecr.<region>.amazonaws.com/my-app:latest
2. Create a Target Group Listening on Port 8080
This step is crucial because your container might be listening on a non-default port (e.g., 8080):
$ aws elbv2 create-target-group \
  --name my-target-group \
  --protocol HTTP \
  --port 8080 \
  --vpc-id <your-vpc-id> \
  --target-type ip
Note: Use
iptarget type when deploying with Fargate.
3. Set Up the Application Load Balancer
$ aws elbv2 create-load-balancer \
  --name my-alb \
  --subnets subnet-abc subnet-def \
  --security-groups sg-abc123 \
  --scheme internet-facing \
  --type application
4. Create a Listener for HTTP Traffic
This allows your load balancer to forward incoming requests to your ECS tasks:
$ aws elbv2 create-listener \
  --load-balancer-arn <alb-arn> \
  --protocol HTTP \
  --port 80 \
  --default-actions Type=forward,TargetGroupArn=<target-group-arn>
5. Define ECS Task With Port Mappings
Ensure your ECS task definition has the correct container port mapping:, Try to create ECS cluster from console and make a note of the container name we need that in the upcoming steps.
"portMappings": [
  {
    "containerPort": 8080,
    "protocol": "tcp"
  }
]
Use awsvpc network mode for compatibility with ALB + Fargate.
6. Create ECS Service with Load Balancer
Finally, deploy your service and wire it to the load balancer:
aws ecs create-service \
  --cluster my-cluster \
  --service-name my-service \
  --task-definition my-task \
  --launch-type FARGATE \
  --desired-count 1 \
  --network-configuration '{
    "awsvpcConfiguration": {
      "subnets": ["subnet-abc123"],
      "securityGroups": ["sg-abc123"],
      "assignPublicIp": "ENABLED"
    }
  }' \
  --load-balancers '[
    {
      "targetGroupArn": "<target-group-arn>",
      "containerName": "my-container",
      "containerPort": 8080
    }
  ]'
7. Access Your Application
Once deployed, head over to the DNS name of your ALB (found in the console or via CLI):
http://<alb-dns-name>
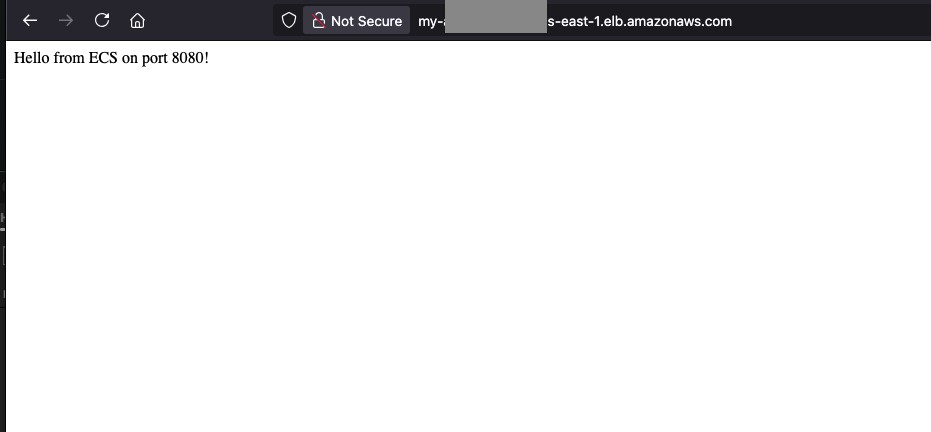
You’ll now see your containerized app running and accessible via the load balancer on the specified port!
How to Containerize a Flask App?
In case if you don’t have a test app here’s how you can containerize a Flask App, perfect for Docker containerization and testing on ECS or locally.
1. Python Test App (app.py)
pythonCopyEditfrom flask import Flask

app = Flask(__name__)

@app.route("/")
def hello():
    return "Hello from ECS on port 8080!"

if __name__ == "__main__":
    app.run(host="0.0.0.0", port=8080)
2. Requirements File (requirements.txt)
flask3. Dockerfile
# Use an official Python runtime as a parent image
FROM python:3.13-slim

# Set the working directory in the container
WORKDIR /app

# Copy local files to the container
COPY requirements.txt requirements.txt
RUN pip install --no-cache-dir -r requirements.txt

COPY . .

# Run the app
CMD ["python", "app.py"]
4. Build and Run Locally
docker build -t test-flask-app .
docker run -p 8080:8080 test-flask-app
Then open http://localhost:8080 — you should see:
Hello from ECS on port 8080!